uXeBoy
A$115
of $2,500 targetyrs ago
Closed on 23rd Jan 2013 at 12:00AM.

uXeBoy is a custom printed circuit board which draws its main design elements from two distinct sources, creating something greater than the sum of its parts:
1. uXeBoy takes its shape and size from the front 'daughterboard' of the original GameBoy, which means it can be easily installed in a GameBoy shell as a direct substitute – it is directly compatible with the already existing parts for the plastic buttons / rubber contact pads, and lines up perfectly with all of the mounting posts and screw holes inside a GameBoy.
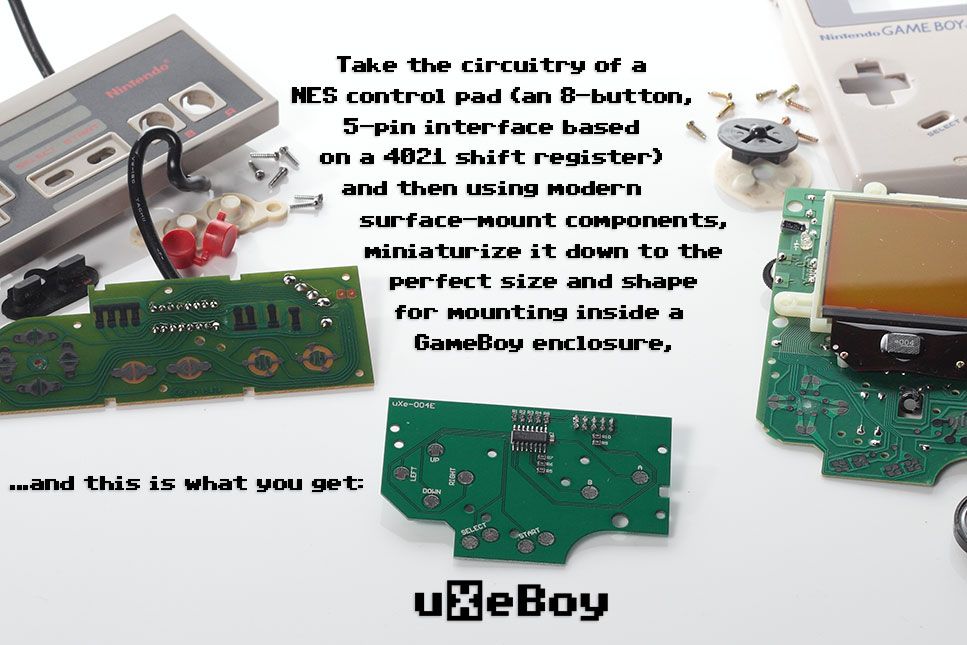
2. For its circuitry, uXeBoy uses modern surface-mount components to replicate the design of a NES control pad. Based on an 8-bit 4021 shift register, this design allows the on / off states for eight separate buttons to be easily transmitted using five wires. The 'NES control pad' interface standard is well-defined, well-documented, and makes the uXeBoy board instantly compatible with any commercially-produced or open-source-hacked piece of electronics that has ever been attached to a NES controller.
The possible applications for the uXeBoy are limited only by your imagination:
Combine the uXeBoy board with a GameBoy shell, a small LCD display, and the microcontroller / microprocessor board of your choice (AVR / Arduino, Raspberry Pi, BeagleBoard, Gumstix, etc.) to create a do-it-yourself handheld device!
Alternatively, you could leave out the microcontroller / microprocessor and connect the uXeBoy directly to your video game console (or a PC running an emulator) as a sort of 'enhanced' NES control pad with a built-in screen – just like the good old Hip Gear 'Screen Pad', but twice as awesome!
Another option could be using a microcontroller to turn the uXeBoy into something like Bandai's 'Mega-Controller' – and have the LCD show customisable settings and parameters, and maybe throw in a tilt sensor? You could design your own system around using the uXeBoy's screen as a sort of 'second display' like the Wii-U 'Gamepad'. Or leave out the screen altogether, design your own enclosure to fit the uXeBoy board and make a pint-sized mini-control-pad!
You could follow the concept to its logical conclusion and make a miniaturised replica of the NES motherboard to fit inside the back-half of the GameBoy shell – or use something like the Papilio FPGA board to create a virtual implementation of the NES motherboard!
Many video artists and musicians use a GameBoy as their interface for performing – for them the uXeBoy could open up a world of possibilities for new performance techniques, while still maintaining the familiar interface of a GameBoy!
And what better time for it than 2013:
Thirty years after the Japanese release of the Famicom / NES in 1983!
To make the production of the uXeBoy boards cost-effective, the initial target is to raise enough funds for a minimum run of 100 boards. But if we can raise more, and make more boards, then so much the better – the sky is the limit!
uXeBoy is based on this tried-and-tested NES control pad schematic:

Although a few alterations were necessary. Firstly, while the schematic shown states a value of 10kOhms for the pull-up resistors, I found that the 'resistors' on the NES control pad PCB itself are actually just little blocks of resistive material that have been measured at 38kOhms of resistance (38kOhms doesn't seem to be a very common resistor value though, so the pull-ups on the uXeBoy are 39kOhms). Secondly, there is a variation between NTSC and PAL models of the NES controller which can lead to incompatibility (details here and here) the solution involved adding two 3.6kOhm resistors to the uXeBoy design in order to ensure universal compatibility.
The uXeBoy's pin-out is a standard 10-pin IDC header with 2.54mm spacing (even though the top row of 5 pins are unconnected, I still feel that the 10-pin header is a better choice than a smaller 5-pin header as it provides for a more secure connection).

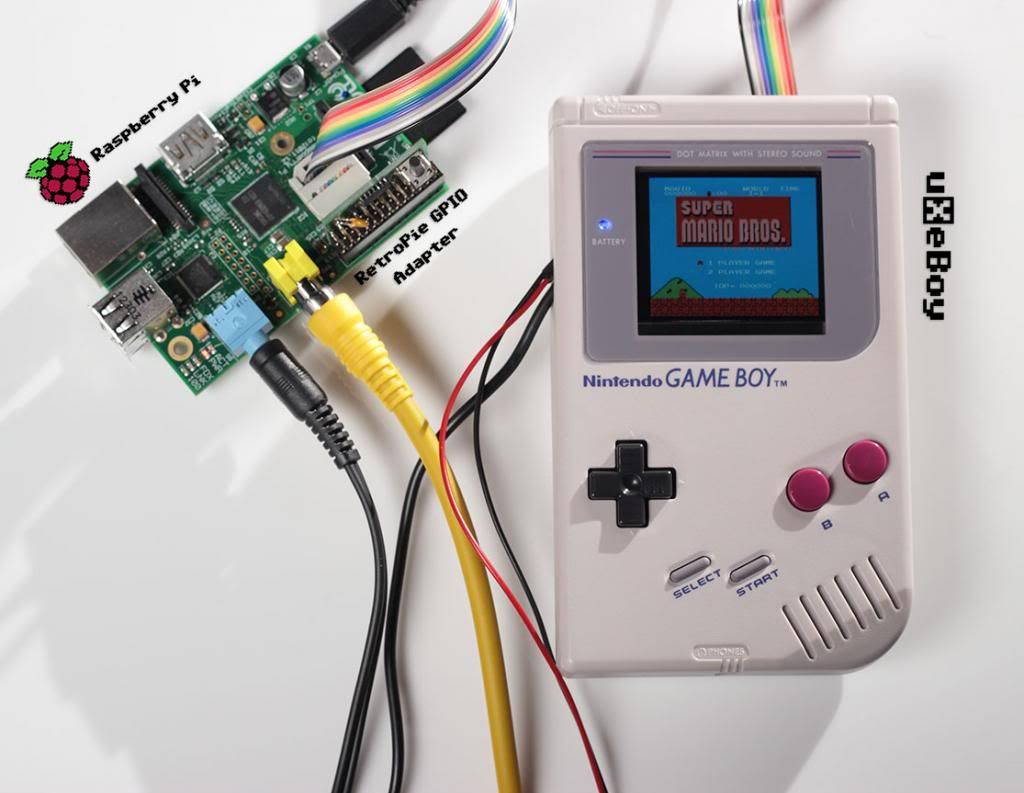
Now for a demonstration! Here is a video of the uXeBoy connected to a Raspberry Pi – at this point I would like to acknowledge all of the hard work previously done by the 'RetroPie Project' that made this demonstration so easy for me to do. Firstly, by having an excellent guide to follow for getting NES emulation up and running on the Pi. And secondly, for the 'RetroPie GPIO adapter board' – I deliberately designed the uXeBoy's pin-out to match the pin-out of this GPIO adapter board, so that connecting the uXeBoy to the Raspberry Pi is a simple matter of connecting both boards with a common 10-pin IDC ribbon cable!
This is just running the default Raspbian distribution from the Raspberry Pi downloads page, so with a little work it could definitely be optimised for a faster boot-time (check out the Marshmallow Entertainment System, for example). The RetroPie project covers much more than just NES emulation, and allows for a good range of games and emulators to be run on the Pi – playing DOOM on the uXeBoy was definitely a new experience for me! The GPIO adapter board provides circuitry protection and a simple interface to the Pi's GPIO pins – but it is also possible to bypass the adapter altogether and make your connections directly to the GPIO pins if desired. Either of the two different software options provided can be used for driving the interface – SNESDev-RPi is a 'user-space' application which translates the GPIO input as a virtual keyboard, while gamecon_GPIO_RPi is a 'kernel-space' driver used to read the GPIO input as a joystick instead.
I have installed a 2.5" LCD display in to the GameBoy shell, and with a little modification there is also room for a 3.5" LCD. Small screens are available in abundance these days – usually intended for use as a 'car reverse camera LCD' which you can disassemble for parts. However you also have the option of buying just the bare LCD and a controller board – which takes some of the guess-work out of waiting for a complete screen to arrive before you can take it apart to find out what is inside! As you can see, my own project is still in the prototype / 'on-the-table' stage with the Raspberry Pi sitting outside of the GameBoy shell – but there has already been quite a lot of effort made and different perspectives shown on ways to fit the Pi inside a GameBoy:
GameBoy PC
GamePi
RasppiBoy
PiBoy
GameBoy Pi Case
Quick and Dirty RPi Server GameBoy Case
Here is another video to show a closer / better view of the LCD (with the power LED disabled) demonstrating the uXeBoy connected to an old NES, running Super Mario Bros. on a PowerPak (watch at 1080p for the best picture).
Making a cable to connect the uXeBoy to a NES console is pleasantly straight-forward – just take a 10-pin IDC crimp connector, pull out the top row of five 'teeth' using a good pair of small pliers / tweezers, then take the cable from a NES controller, and with a steady hand and a little bit of patience line up the wires by colour into the five remaining sets of 'teeth' and crimp the connector closed (if the wires in your cable do not follow the same colour-coding then you can just check for continuity to figure out which pin on the NES connector corresponds to which wire).

If you don't want to sacrifice a NES controller for its cable, and you are comfortable with modifying your NES instead, then you could install any type of connector you like and solder directly to the points for the NES expansion port on the motherboard – all of the signals are there for controller port two, and even for video-out and audio-out as well! You are not just limited to the NES – the Famicom and SNES / Super-Famicom use the same control pad interface (in theory you could even daisy-chain in another 4021 shift register for the extra SNES buttons). Another alternative to cutting off the cable from a control pad would be to find a 'controller extension cable' for the NES / SNES / Famicom and use that instead (the wires inside will probably not use the same easily identifiable colour-coding though). I have successfully tested the uXeBoy with NES to USB and NES to WiiMote adapters, there is also potential compatibility with Famiclone or NES-on-a-chip systems, and then there are home-brew consoles like the Uzebox (which is probably small enough to fit inside the GameBoy shell!) and the XGameStation that are specifically designed to interface with the established NES control pad interface standard.
An important goal of the uXeBoy is the sustainability of our retro-gaming heritage – there are mountains of projects out there re-purposing, modifying, and hacking old GameBoys to squeeze something new and unique inside the iconic and instantly recognisable form of a GameBoy. But all too often this means taking the circuit board of a GameBoy or a NES controller and hacking it to pieces for the sake of the project. The uXeBoy board provides the perfect solution – a neat, clean, professionally produced PCB that allows you to “make an omelette without having to break any eggs” so to speak, and keep one more working GameBoy or NES control pad in the world. My sincere hope is that any GameBoys or NES controllers that are dismantled to make a uXeBoy will be preserved and kept alive. If the motherboard / daughterboard of your GameBoy were working before being removed then they may very well find a good home with someone who is trying to repair a broken GameBoy. Better yet, you could transplant the old boards into a new shell – giving them a brand new lease on life! Similarly, if you need to remove the cable from a NES controller, then you could easily refurbish the old control pad with a microcontroller and a new cable for use as a retro-styled USB controller! In fact, the exact same technique could be used to turn the uXeBoy into a USB device – here are a few examples of the ready-made solutions:
NES/SNES RetroKit
NES/SNES GamePad (and Mouse) to USB Adapter
USB NES Pad Adapter
NES/SNES Controller to GameCube/Wii Adapter
And here is some more eye-candy (photography by the talented Mr. Marc Morel):


uXeBoy PCB (includes shipping worldwide)
10 uXeBoy PCBs (includes discounted shipping on bulk orders of 10 - for online retailers who would like to stock the boards, or use them to build and sell completed units)